Spring Security에서 어떻게 인증이 시작될까?
Spring security는 내부에 인증 절차가 이미 구현되어 있다. spring security의 인증 절차를 이해하고 난다면, 구현체와 설정을 통해서 새로운 인증 절차를 추가할 수 있다.
이번 글을 통해서 아래 내용을 이해하자.
- Spring security 아키텍쳐 기반에서 인증 절차가 어떻게 진행되는가?
- 실습을 통해서 커스터마이징된 인증 절차 개발시 어떤 작업을 추가로 해야 하는가?
1. Spring security에서 인증절차 이해하기
Spring security는 AuthenticationManager(ProviderManager)가 가지고 있는 provider 목록을 순회하면서 provider가 실행 가능한 경우에 provider의 authenticate 메소드를 호출하여 인증 절차를 수행한다.
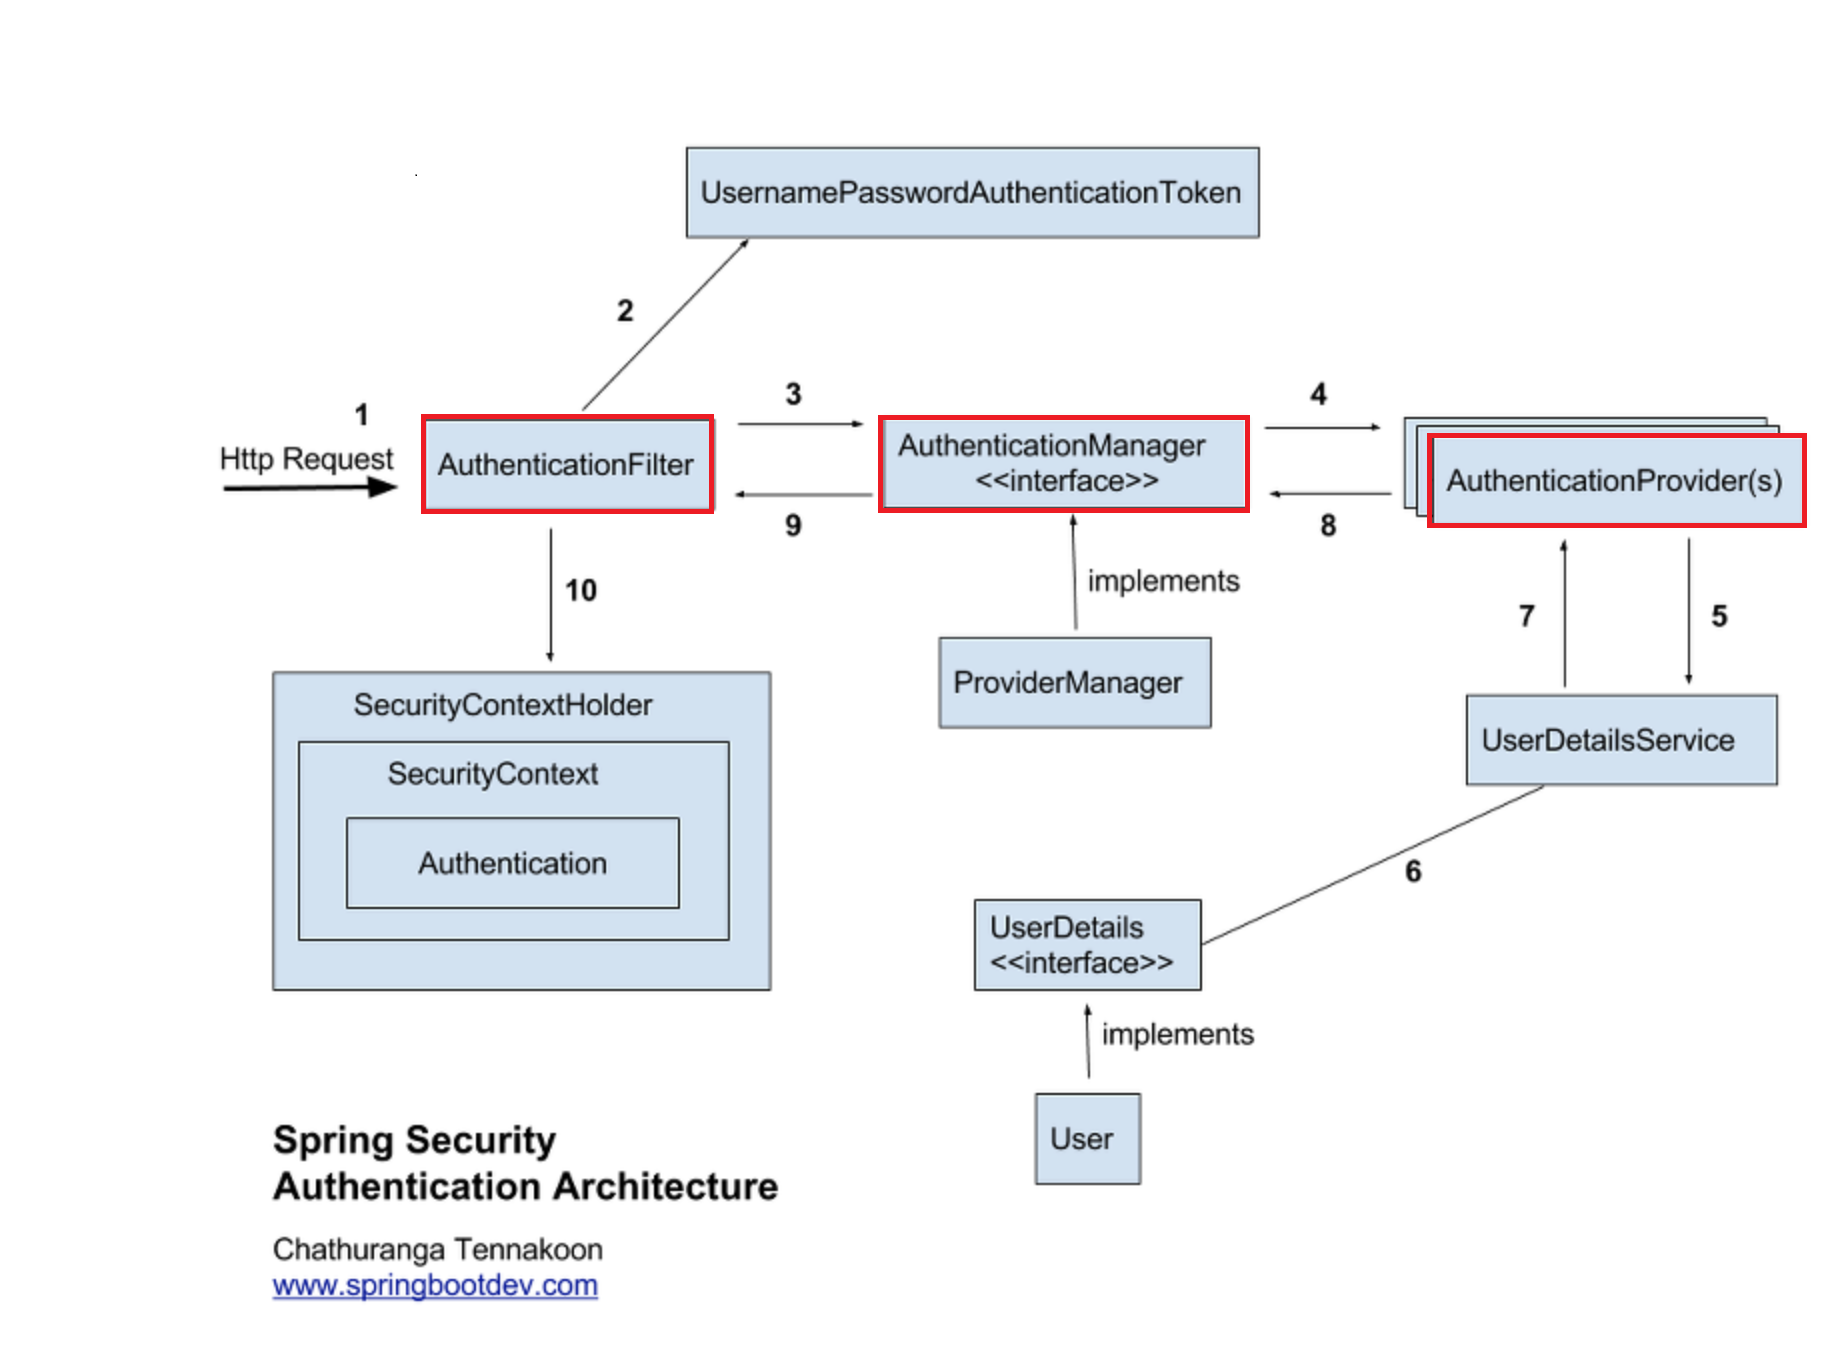
a. AuthenticationManager
AutheticationManager는 인증을 처리하는 방법을 정의한 API이다.
- AuthenticationFilter에 의해 AuthenticationManager가 동작한다.
- 인증을 처리하면 SecurityContextHolder에 Authentication 값이 세팅된다.
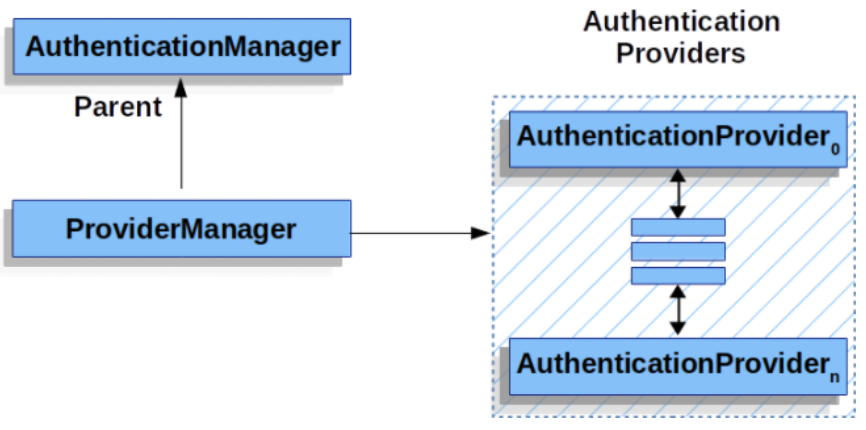
b. ProviderManager
ProviderManager는 AuthenticationManager의 가장 일반적인 구현체이다. ProviderManager는 AuthenticationProvider 목록을 위임 받는다.
각 AuthenticationProvider는 인증 성공, 실패, 결정할 수 없음을 나타낼 수 있고, 나머지 AuthenticationProvider가 결정을 할 수 있도록 전달한다.
기본적으로 ProviderManager는 Authentication 성공적인 인증 요청이 반환하는 Authentication 객체에서 민감한 credential 정보를 삭제하려고 시도한다. 이렇게 하면 암호와 같은 정보가 HttpSession에서 오래 지속되는 것을 방지한다.
이런 방법은 stateless application에서 성능 향상을 위해서 user 객체를 cache에 사용할때 문제가 발생할 수 있다. Authentication에 cache에 있는 개체에 대한 참조가 포함되어 있고, 이 개체의 credential이 제거된 경우, 더 이상 cache 값에 대한 인증할 수 없다.
따라서 cache를 사용하는 경우 이 문제점을 인지하고, 캐시 구현 또는 반환된 인증 객체를 생성하는 AuthenticaionProvider에서 먼저 객체의 복사본을 만드는 것이다. 또는 ProviderManager의 eraseCredentialsAfterAuthentication 속성을 disable을 적용하라.
1 | // spring-security-core.jar 원본 소스 참고 : ProviderManager 클래스의 authenticate 메소드 |
c. AuthenticationProvider
각각의 AuthenticationProvider는 특정 유형의 인증을 수행한다.
- id, password 기반 인증 경우 : username / password 가 유효한지 검사
- saml 기반 인증 경우 : saml assertion을 수행 후 authentication 리턴
2. 실습하기
spring security 구현체에 대해서 알아보았으니, 아래 요건에 해당되는 실습을 해보자. 추후에 커스터마이징한 기능을 만들 상황에 대비해서, 직접 provider, token, filter를 각각 만들어보겠다.
(참고 : DB 기반 id/password 인증은 spring security의 DaoAuthenticationProvider을 사용하더라도 동작한다.)
구현체
실습을 위해서 직접 생성한 구현체들에 prefix로 ‘Custom’을 붙여 네이밍한다.
- CustomAuthenticationProvider
- id, password 기반 인증
- CustomAuthenticationToken
- email, credentials 포함하는 별도 token 생성
- CustomAuthenticationFilter
- CustomAuthenticationToken을 사용하여 provider의 authenticate 메소드를 호출
- 특히, saml 인증 방식 사용하는 경우, 해당 필터에서 saml assertion을 진행 후 인증을 수행하는 provider 호출
- WebSecurityConfig
- custom provider를 AuthenticationManager에 추가하는 설정
- custom filter 설정
a. CustomAuthenticationProvider
Provider 내부에서 하는일은?
provider 내부에서 인증 절차를 수행할 뿐 아니라, 추가적으로 supports 메소드를 통해서 token 타입에 따라서 언제 provider를 사용할지 조건을 지정할 수 있다.
실제 클래스명은 의도를 명확하게 하는 의미있는 명으로 naming 하는 것이 좋기 때문에 ‘Custom’ 대신에 프로젝트 keyword를 사용해도 좋다.
provider 동작 여부
supports 메소드를 override하여 provider의 동작 여부를 결정할 수 있다. 예제처럼 커스터마이징된 token을 사용하는 경우로 provider 동작조건은 제한함으로써 다른 인증 수행하는 provider에게 영향을 주지 않는다.
- CustomAuthenticationFilter에 attemptAuthentication 메소드 내부에서 token을 사용하여 provider를 호출하는 부분이 선언되어 있다.
- provider의 supports 값이 false를 리턴하면, provider의 authenticate 메소드가 호출되지 않는다. (참고 : ProviderManager 소스)
1 |
|
기본 인증 절차
- 16 Line
- provider 내부에서는 username을 가지고 사용자 정보를 조회 (UserDetailsService 호출)
- 실습에서는 username이 email 값이 입력된다. (CustomAuthenticationFilter 참고)
- 17 ~ 23 Line
- 사용자 정보가 유효한지 판단
- 유효하지 않은 경우 (예: 사용자 정보 존재하는지, 계정 잠김, 비밀번호 실패 초과), RuntimeException 발생 (예: BadCredentialException) 후 에러 응답 처리한다.
- id, password 기반 인증이라면, password가 일치하는지
- 25 Line
- AuthenticationToken에 사용자 정보(username, authorities)를 세팅한다.
- token 자체가 Authentication 객체이기 때문에, 이후에 SecurityContextHolder 내부 context 객체에 token 값이 저장되어 있다.
b. CustomAuthenticationToken
spring security에 기본적으로 제공하는 token이 존재한다. (예: AnonymousAuthenticationToken, UsernamePasswordAuthenticationToken)
spring security에서 제공하는 token 외에 추가적인 필드들을 가져야하는 경우 별도의 token을 생성해야 한다.
1 | public class CustomAuthenticationToken extends AbstractAuthenticationToken { |
- 1 Line
- AbstractAuthenticationToken을 상속받는 custom token 클래스 생성.
- principal : 사용자를 식별할 수 있는 값 (예: id, email)
- credential : 일반적으로 비밀번호를 의미
- 인증을 통과하여 생성된 token은 SecurityContextHolder의 context로 부터 얻어올 수 있다.
c. CustomAuthenticationFilter
만약 provider의 supports 메소드의 리턴값을 항상 true로 해둔다면, 다른 인증방식을 수행할때도 provider가 동작하게 될 것이다. 따라서 이번 실습은 특정 CustomAuthenticationToken을 사용하는 경우에만 provider가 동작되게 설정했다.
인증을 수행하기 위한 별도의 provider를 생성했고, provider가 특정 token을 사용하는 경우에만 동작하도록 설정을 했다. 해당 filter에서 custom token을 가지고 provider를 실행하는 부분을 선언한다.
1 | public class CustomAuthenticationFilter extends AbstractAuthenticationProcessingFilter { |
- 8 Line
- AbstractAuthenticationProcessingFilter을 상속받아서 attemptAuthentication을 override 한다
- 예를 들어 saml 인증방식을 사용하는 경우 saml assertion을 수행 후, 통과하면 id 또는 email로 provider를 통해서 인증을 수행한다.
- 13 Line
- custom token을 사용하여 provider를 실행하는 부분을 정의한다.
d. WebSecurityConfig
WebSecurityConfig는 WebSecurityConfigurerAdapter을 상속받아 security 관련 설정을 관리하는 java config 클래스다.
1 |
|
- 12 Line
- http 요청에 대한 security 설정
- 18 Line
- 인증을 위해 생성한 custom filter 적용, .addFilterAfter() 또는 .addFitlerBefore() 메소드를 사용하여 filter 실행 순서를 상대적으로 지정할 수 있다.
- 32 Line
- email / password 기반 인증을 수행하는 custom provider를 AuthenticationManager에 등록
- 37 Line
- custom provider를 사용하여 인증을 진행하는 custom AuthenticationProcessingFilter를 선언하는 부분
- “/api/v1/login” 주소로 POST 요청이 오면 해당 filer 가 동작한다.
- 인증이 성공하면 “/hello” 화면으로 redirect
- 인증이 실패하면 “/login?error” 화면으로 redirect
3. 동작 확인
start-security 프로젝트에서 resources/db/data.sql을 참고하면, 테스트 사용자 계정을 확인할 수 있다.
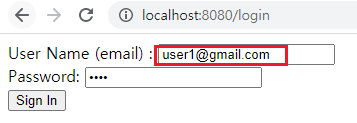
- 테스트 계정 1의 id/password : user1@gmail.com/1111
- 테스트 계정 2의 id/password : user2@gmail.com/2222
- adamin 계정의 id/password : admin@gmail.com/3333
1. 로그인 시도
- 로그인 화면 주소 : http://localhost:8080/login
- 서버로 로그인을 위한 “/api/v1/login” 주소로 POST 요청이 날아간다.
- 서버에서는 CustomAuthenticationFilter에서 CustomAuthenticationProvider을 통해서 email/password 기반 인증을 처리한다.
2. 인증 성공시
- filter의 successHandler에 따라 “/hello” 화면으로 redirect 된다.
- session 정보가 있음을 화면을 통해서 확인 가능하다.

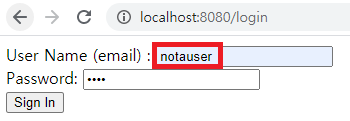
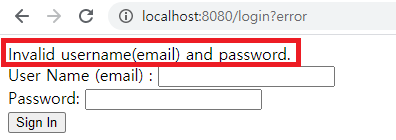
3. 인증 실패시
- filter의 failureHandler에 따라 “/login?error” 주소로 redirect 된다.
- 로그인 화면에서 error 문구(“”)가 출력되는 것을 확인 가능하다.
마치며
이번 글을 통해서 Spring Security에서 어떻게 인증 절차가 시작되고 진행되는지 알아보았다.
spring security 기반에서 별도의 인증 절차를 직접 구현하기 위해서,
- AuthenticationFilter
- AuthenticationManager (ProviderManager)
- AuthenticationProvider
각각의 역할에 대해서 꼭 기억하길 바란다.